How to utilize the eDART Data Extractor Software
Applies to: eDART, RJG System Utilities, Windows software, Cycle Graph Data, Summary Graph Data, Analyzer Software
Required: eDART, Network Connection, Ethernet connection, RJG System Utilities Software Download, RJG Insight
Warnings: Running the eDART Data Extractor can be blocked by Windows Defender Firewall, or other 3rd party Security Software. Please follow your companies IT policies or contact your company’s IT Administrator.
Description: If there are eDART Systems that are not connected to a network or utilize the EDM (eDART Data Manager) data backup or cross copy functions, where there is the need to extract Cycle or Summary Graph Data, Mold or Machine Job Setup Configurations, or even Mold Templates, this guide will help walk through the process of successfully retrieving eDART Data as well as steps to place the extracted data onto another eDART System.
RJG System Utilities/RJG Insight Software Package – eDART Data Extractor
The eDART Data Extractor software is included in the RJG System Utilities software package. You may download the RJG System Utilities Here.
Start by targeting the eDART System that a user is attempting to extract data from. This can be done over a network from an EDM Server, or locally my utilizing a cross over cable between a PC and the eDART System. When connecting an eDART system to a PC, the user will have to adjust their PC’s ethernet adapter’s IPv4 settings to be within the same subnet as the eDART System. A quick step by step process on how to complete this can be found in RJG’s Knowledge Base: How to Connect an eDART System to a PC.
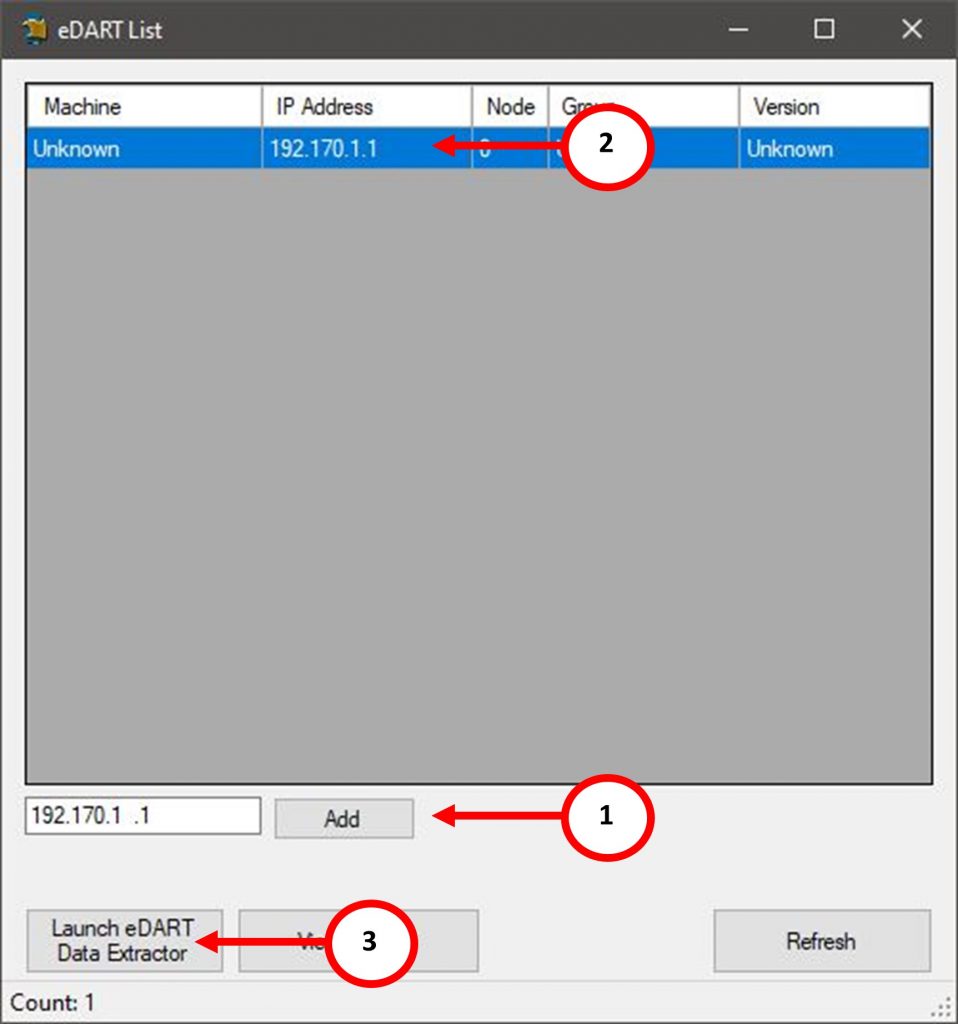
Write down and retrieve the eDART’s IP Address and open up the eDART Data Extractor Program. Enter in the eDART’s IP Address into the eDART List and select the “Add” Button. The eDART will populate within the application. Note: You may have to select the “Refresh” button for the eDART to Populate.
Select the eDART’s IP Address and Select the “Launch eDART Data Extractor” button.
Selecting Mold Cycle & Summary Graph Data
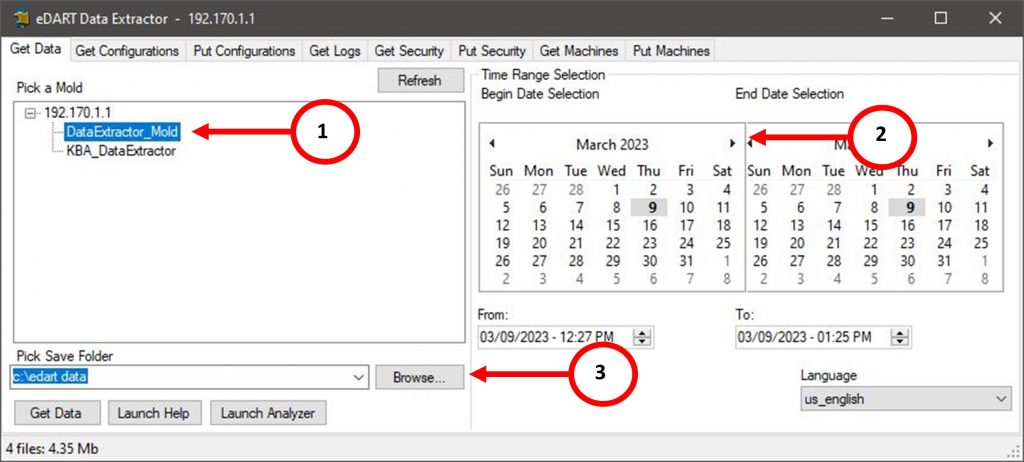
Once the eDART Data Extractor Software is open, the “Get Data” tab should be automatically selected.
- Search for the Mold Name/Number in the “Pick a Mold” list.
- Towards the right-hand side of the application, select the Time Range of data to extracted. Dates that are bolded are dates that have data that was ran during that time. The left calendar is the Begin/Start Date Time, and the right calendar is the End Date Time
- Note: The more dates that are selected, the longer it will take to extract data. It is best practice to only select the time range of the data you are attempting to extract.
- Once the data and dates are selected, select the location of where the data will be saved to on the PC.
By default, the application will save data to the C:/ drive and create a new folder named “edart data”. In this directory the Mold Name will be added, and the eDART Data will be extracted to the directory.
Any templates that are saved within the Mold file, will also be extracted with the rest of the data.
This data can now be opened for review in the RJG Analyzer Software or be kept as a backup. eDART Systems have a 4GB Compact Flash Drive. Depending on cycle times and amount of sensors collecting data, eDART data can be store for up to 2+ weeks of continuous run time before it starts to replace the oldest data with the most recent data.
Extracting Mold Setup/Configuration Files
eDART Users can extract Mold or Machine Configuration/Setups which can be stored on a PC, and then also be transferred to another eDART system utilizing the eDART Data Extractor software. These files will contain information such as: Ejector Pin Size setups, Sensor Location Setup, Cycle or Summary Graph configuration, Alarm Settings, and Mold Templates.
Note: This function will only extract Mold configuration files and will not extract any Cycle or Summary Graph Data.
Essentially, taking a Mold File from one eDART System, to be placed on another eDART system, thus saving time by not having to re-enter or setup each Mold Sensor, Identifiers, Alarm Limits, Recreating a Template etc.
Note: For attempting to use a template from one eDART to another, ensure that the sensors that are being utilized have the same unique identifiers if different serialized sensors are to be used. Not setting up the same identifiers will result in “?” for time template values on the eDART Systems Cycle Graph.
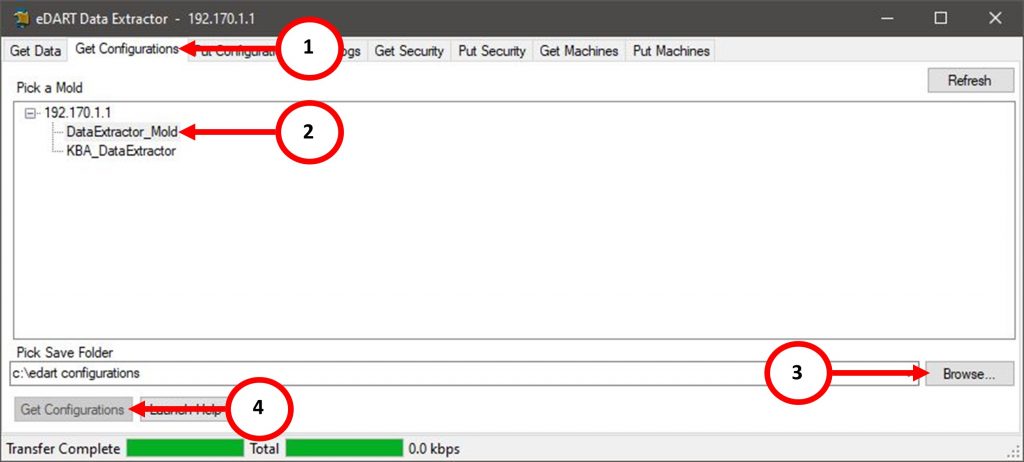
Open eDART Data Extractor Software.
- Select the “Get Configurations” tab.
- Select the Mold Name/Number to highlight.
- Select the destination on the PC to store the Mold File. By Default, the eDART Data Extractor software will create a “edart configurations” folder on the C:/ Drive.
- Select the “Get Configurations” button and the Mold Files will be downloaded to the chosen or default destination.
Placing an extracted Mold Configuration/Setup onto Another eDART System
If an eDART Mold Configuration/Setup File was extracted from one eDART System and stored on a PC, close out of any eDART Data Extractor programs, or Open up the eDART Extractor Software, and add in the targeted eDART Systems IP Address.
- Select the “Put Configurations” Tab on the eDART Data Extractor software.
- Browse for the Mold Setup/Configuration folder on the PC. By default, it will look for Mold Files in the “C:/edart configurations” directory.
- Select the Mold File
- Select the “Put Configuration” button, and the software will send the Mold File to the eDART System.

The Mold File will be available in the Job Startup drop down selection menu on the eDART System. For any questions or assistance. Please contact the RJG Technical Support Department.
RJG Technical Support
800-472-0566
support@rjginc.com