
Ready-to-go Molds with Cavity Pressure – Part 1 of 2
You are a good molder. You can make any reasonable mold produce good parts. It may take a little time to tweak them in, but you do well most of the time.
Your customers are constantly beating you up when you send them any bad parts. They expect absolute quality and price concessions at the same time! In addition to these challenges, your competition is ruthless. So you just don’t know what else to do.
That scenario is all too familiar. Many molders understand how to tweak processes and have mastered all of the tricks of the trade but it’s not enough in today’s world. Today you need to know and think like your customers.
Customers for molded parts are under tremendous strain today. They have to deliver absolute quality parts; with shorter lead times and shrinking margins and what they need from you is a quick response and 100% good parts. Sound impossible? It isn’t if you start with a Ready-To-Go mold.
A Ready-To-Go mold can be defined as a mold that can be put in the press, set up by the least qualified molding technician, without breaking any rules. It can make parts predictably and quickly on cycle and can run unattended without adjustment throughout the run.
How do you get a Ready-To-Go mold? In this two part series, all the details of Ready-To-Go molds will be discussed, from verifying fit and function in part 1, through process development in part 2.
Part 1- Fit and Function
You must start with a good design of both the part and mold with no broken rules. Obviously, it is also important that the mold be built to exacting standards and thoroughly tested to insure all items function as designed.
Always pre-flight the mold
Many important features of the mold should be checked before it is ever clamped into a molding machine. Coolant flow and pressure loss through the cooling channels should be quantified before sending the tool on to the molding room. Any moving cores or slides should be checked for freedom of movement with the mold pre-heated to the desired operating temperature. Also, if there is a hot manifold it should be carefully checked for any potential problems prior to scheduling a tool try-out in a production machine.
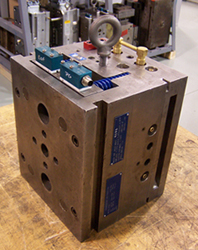
Figure 1.
Once the basics are verified it is time to perform a ‘Rigorous Mold Try Out’.The objective of a Rigorous Mold Try Out is simple: Challenge the mold early and hard to avoid problems once the mold goes into production. It sounds almost too obvious to mention, but many molders fail to perform this important phase of mold development. The reasons are all too familiar: “There will be time to fix the mold after the customer approves the parts – we can’t afford to miss this deadline!” The costs of rushing to market without robust tooling can be measured in more than just the immediate bottom line profits. It can degrade your reputation resulting in lost opportunities for future business – sometimes ending in severed customer relationships.
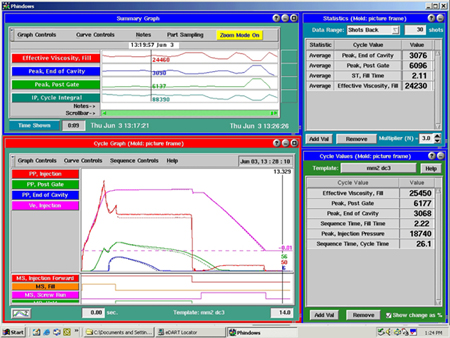
Figure 2.
The tryout
A Rigorous Mold Try Out starts with following the directions from the material manufacturer. The barrel, nozzle, (and when applicable – hot manifold) temperatures should be set to deliver plastic at a melt temperature in the middle of the recommended range. Next, the mold must be filled as fast as consistently possible. There should be no jetting, burning, or flash when the mold is filled fast.
DECOUPLED MOLDINGSM is a technique that separates the fast filling of the mold from the sudden stop when the end of cavity is reached. This technique should be used during all new mold tryouts to insure that the mold is capable of running a robust process during production. At this time, it is also crucial to measure the degree of balance between the various cavities on a multi-cavity mold.
After filling, the mold must be pressurized to get a good imprint of the cavity and minimize the effects of volumetric shrinkage. It is important that any new mold be packed to a minimum pressure of 3000psi or 200mpa at the end of the cavity. Any mold that cannot be pressurized to this degree at the last area to fill without flash will most likely be problematic when normal viscosity variations of material occur during production runs.
As part of a Rigorous Mold Try Out, we at RJG believe it is essential to instrument the mold with cavity pressure sensors to see what is going on inside the mold. The sensor(s) allow you to quantify if the mold can be packed properly without adverse effects. It is also important to determine whether or not the gate is sealed after the cavity has been pressurized. Observing cavity pressure near the gate and seeing whether or not it is maintained after hold pressure is removed, is the simplest most effective way to determine gate seal.
Since cooling is approximately 80% of the cycle, challenging the mold cooling system before a mold goes into production is crucial. Proper flow through each cooling channel should be verified before the mold ever leaves the tool room. During the Rigorous Mold Try-out it is important to create a mold surface temperature map. Cavity pressure data can greatly assist in repeating cooling conditions in production runs as any changes to cooling will be evidenced by changes in the cavity pressure drop off.
Any problems uncovered during the Rigorous Mold Try-out should be corrected before continuing. If any good parts are molded before the mold is corrected they should be destroyed. Too many times the excuse of “it made good parts last time it ran” has been used to keep poor performance tools from becoming Ready-To-Go tools.
In summary, the methodology to develop and launch Ready-To-Go molds is here and proven. It requires teamwork by all involved. Education is essential. Following this advice will pay big dividends for the few who have the discipline to carry it out.
Next month, in part 2, we will continue with discussing process development and tool adjustment.