
What Is Viscosity and How to Monitor It in Injection Molding Processes

A student once joked that, “9 out of 10 times when you ask a question, the answer is viscosity.” While it’s probably not quite 9 out of 10, the student did have a point. We like asking why things happen, and quite often viscosity is indeed the answer. If the viscosity of the material was either consistent or predictable, this whole injection molding thing would be easy.
If, by the student’s estimation, 90% of our issues come back to viscosity, it sure would make sense to track it. This article covers the definition and characteristics of viscosity, why it’s important to monitor viscosity, and how to measure viscosity.
What Is Viscosity?
Viscosity is a fluid’s resistance to flow, or the amount of friction that exists in the material. The higher the viscosity, the more friction that exists, so the more pressure you need to inject it into a mold.
Picture a plain chain necklace and a necklace with a lot of large beads on it. Which necklace would go down the drain easier? The plain chain, right? That’s the same idea with viscosity—with low viscosity, the molecules are lined up in a plain, simple chain. Higher viscosity means more complexity and friction (beads), so it is more difficult to inject.
Viscosity often changes from lot to lot of the same exact material. As you can imagine, a viscosity change could greatly affect how your process runs, leading to poor quality parts when nothing else has changed. Without knowing it’s viscosity, this can be quite confusing and lead to a lot of unnecessary button pushing and scrap. Or worse, shipping bad parts.
Another cause of viscosity change is plastic degradation. Plastics can degrade in different ways, one of which is polymer chain degradation, a simple breaking of the polymer chains. Two important things happen when polymer chain degradation occurs: the material becomes weaker and the viscosity lowers. There are clear part performance issues with weaker material, and lower viscosity plastic will tend to give us issues, such as out of spec dimensions or flash.
Why Is It Important to Monitor Viscosity?
If we track viscosity changes over time, we can often be alerted to problems well before quality has a chance to inspect the parts. When viscosity rises, pressure in the cavity drops, which yields smaller parts or parts with sinks and shorts. As contradictory as it may seem, higher injection pressures typically indicate lower cavity pressures.
More often than not, short shots correlate with higher viscosities, and flash correlates with lower viscosities. Figure 1 shows an example of data over time. Notice the clear correlation between viscosity and cavity pressure—molders who are already using instrumented molding are likely familiar with this correlation. Since variations in cavity pressure influence most of our issues (dimensional variation, shorts, sink, flash, warp, etc.), tracking one of its drivers is tremendously valuable.
Tracking viscosity is a vital step in solving a great deal of your molding problems. Next time a solid process turns into a headache, you won’t have to guess whether the viscosity changed, or by how much.

How Do You Measure Viscosity?
Determine Melt Flow Index
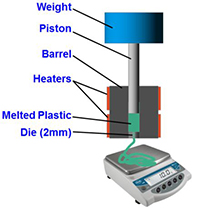
One of the most common ways of measuring viscosity is MFI, or melt flow index. The melt flow test measures how much plastic can be pushed out of a small hole in a given amount of time.
The test is very simple: plastic is put into a heated pot and then pushed out of this pot through a small hole via a piston with weights pushing on it. Each type of material should have specified temperatures and weights that are used to make the test valid. After ten minutes, the material that has been pushed out of the heated pot is weighed. This value in grams is the MFI.
Materials with lower viscosities will result in more material being pushed out of the heated pot, therefore a “16 melt” has a lower viscosity (is easier to flow) than a “12 melt”.
When a new lot of material comes in, the vendor will often specify what results that lot received from the MFI test. In our classes, we teach that we can expect up to a 20% viscosity shift in the material itself, irrespective of any damage the molder may or may not do to it. If this sounds like a large number, look at your next lot and you will see that the tolerance range on a “12 melt” material maybe as large as 7 to 15 percent, or even a bit over 20 percent!
As valuable as knowing the MFI of a particular lot is, consider that this is a very small sample (quite literally a few grams) of a tremendous amount of material—perhaps hundreds of tons. Even molders who are aware of MFI often relegate it to the realm of the material suppliers. Once the lot is out of the shipping dock, MFI becomes a forgotten concept, which is unfortunate, because the MFI test can tell us a great deal about our material.
Melt Flow Indexer Tool
A Melt Flow Indexer can be purchased for much less than the far more common moisture analyzer and can be a very helpful tool for determining if a material has degraded. It uses a weighted plunger to push plastic out of a heated pot, and although not every molder has this particular piece of equipment, they all have something very similar—an injection molding machine.
For example, if we compare the condition of the plastic in the feed throat to the condition of the plastic after it has been molded, we can determine if we are indeed degrading our material and take action to correct the situation. Although we often assume that all degradation occurs in the barrel, we can damage plastic at multiple phases of the value stream. Chemical contaminants during shipping, over drying, or exposure to UV light can all cause polymer chain degradation, and isolating the root cause is the first step in fixing the issue.
Viscosity can be thought of as how hard we are working to flow the material. If I asked you, “What is more work: moving 50 pounds, 10 feet or moving 100 pounds, 5 feet,” you could make the argument that they are both equal amounts of effort. We can use the same thought process to calculate the effective viscosity of our material. By multiplying the fill time by the injection pressure at transfer, we can approximate how hard the machine is working and for how long.
Conclusion
Determining viscosity, knowing when a material has degraded, and monitoring viscosity during the injection molding process is vital to preventing part defects before they happen, or stopping them quickly with minimal scrap. With the right tools, it’s an easy task with a huge payout.
Learn more about viscosity in our Fundamentals of Injection Molding training course.