
Tip of the Day 53: Set Fill Volume to get Good Viscosity
You have already read this, of course, but repetition is one of the 3 R’s in teaching.
Here is an example of why it is important to set the fill volume. If the eDART does not know where fill is supposed to end then the only guess it can make is to use peak injection pressure. Typically this will indeed be the end of the fast speed portion of the filling of the cavity. As soon as the machine slows down, less injection pressure is needed and the pressure drops off. Thus the peak seems to work much of the time.
Remember that viscosity is the area under the curve during fill. If the eDART has to guess at “fill” then here is what can happen. So try to remember to set fill volume on new processes. Once set the eDART remembers it for that process.
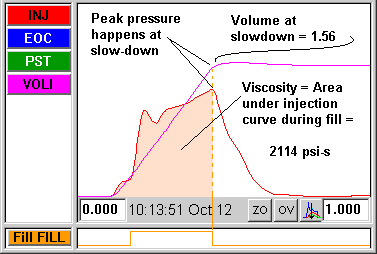
Shot #1: Good Viscosity Number
End of fill is determined by the peak and the peak occurs at the correct time. (this is a short shot while doing a rheology curve)
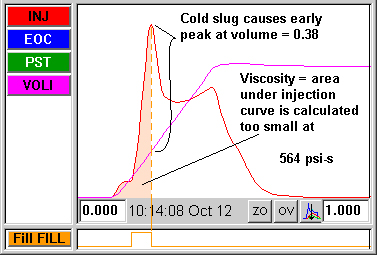
Shot #2: Next Shot – Truncated Viscosity Number
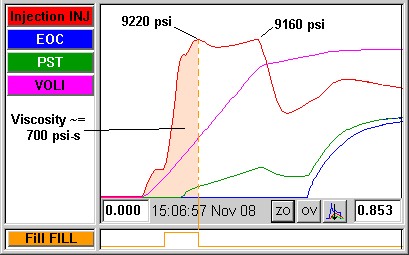
Here a sticky sprue or cold slug is causing an early peak in the injection pressure. So without the fill volume set the viscosity number is calculated smaller than it should be. If this happens on alternating cycles then the viscosity number on the summary graph goes up and down dramatically and looks like noise.
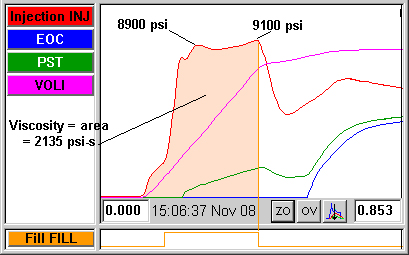
#3: Peaks Close in Value
Note that the above is a relatively dramatic example. Sometimes the cold slug peak on every shot is almost the same level as the end of fill peak. So the end of fill time can jump back and forth while the curves look almost the same.
Note: The “Auto-Set Fill Volume” is standard in Release 8.5 as part of the “Sequence Settings” tool (Machine Fill tab) on the eDART. If the eDART is using peak injection pressure for end of fill this tool sets the fill volume at the first dramatic slow down in speed after 20 stable shots. You can view the document here.